
OK, so this post is may not be of interest to all our readers. Firstly it’s written by Pete on a cold and windy Saturday afternoon, needing something to distract him from the weather forecast he downloaded that morning:

Secondly, its more technical, as its goes into detail about the turret construction. I have found this to be the most interesting & technically challenging fabrication so far, and thought the other builders who follow this blog may find it informative. For those who are just interested in our general progress … look away now, because a fair degree of nerdiness follows.
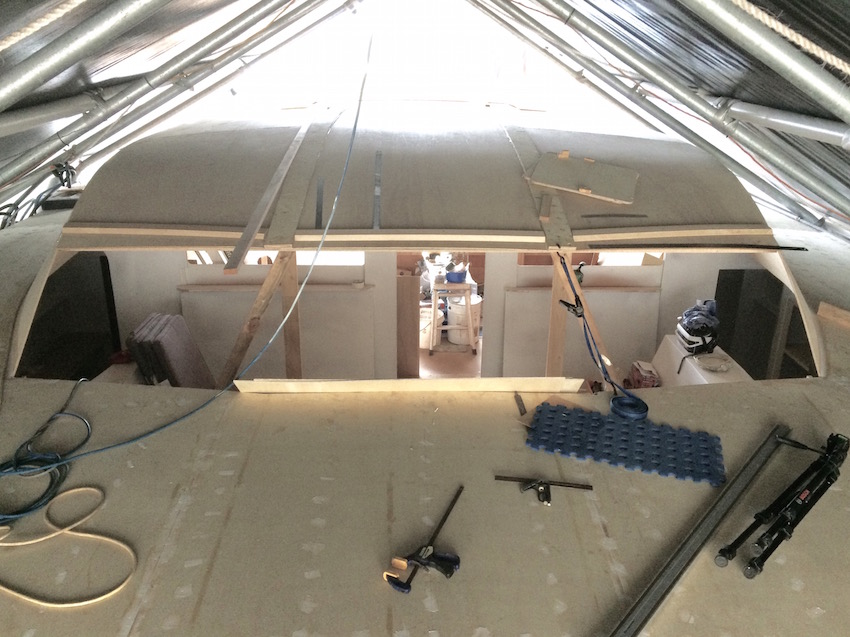
After fabricating the turret sides, and erecting the temporary supports needed to support the roof whilst under construction, we began laying out the roof sheets.
There’s a few things that became apparent along the way. Firstly, it’s big: three sheets wide by two and a bit sheets long. Secondly, as the sheets are 6mm, they are floppy and have a mind of their own. Thirdly, a fair bit of thinking time is necessary, figuring out the best building method, as it’s an inherently awkward assembly to pull together. It’s definitely a two person job, one below screwing, one above checking alignment, and confirming the various laminations “pull together” correctly.
We decided to resin the underside prior to installation, to avoid as much overhead work as possible. We will still need to bog the screw holes, sand and paint, but at least the resin protective undercoat will have already been done.
Fortunately I remembered to scribe the centerline on both sides, of the center sheet, which made lining them up straightforward, and will give a reference for laying out the 42mm battens that are to be added later. Cleats attached to the temporary frames were used to hold the sheets down. We started with the centre sheets, aligned to the centerline, which was scribed onto the frames and supports using the laser level. The butt-boards were laminated in place next, then the outboard sheets slid under, glued and screwed, and to the sides as well. The fore-aft join was above frame seven.
As per the plans, the sheets are fixed together with butt-boards, two layers thick, that run the entire length of the assembly. We found we could laminate all three surfaces of the butt joints in situ at the same time, by pre-drilling the roof & first butt-board with slightly oversize holes, then laying the second butt-board on top, and screwing the whole assembly up from below. This squeezed the three layers together ensuring full glue contact. Deb “spotted” from above, and we added extra screws if she did not see glue oozing from any given join line.

It took us two big days to dry-fit, cut, sand, resin & glue the six sheets. We finished gluing the last sheet in the dark on Wednesday evening. Deb has Thursdays off, so I was keen to get up to site the next morning and check out the work. Overall I was happy with how the sheets conformed to the camber of the supports, with ony two small sections that needed to be pulled down into shape with additional cleats. I did notice however, that the ply that projected forward of the front of the turret, did not conform to the bearers, and basically did its own thing. Tricky …because of the angles and camber, there is no real point of reference to measure against here. I spent the morning, measuring, looking and thinking, trying to understand the forces at play and the best way to manage them. As is my habit, I then decided to let the issue percolate for a while, while I edge trimmed the side/roof join. Not as easy as it sounds due to the proximity of the shelter beams, requiring a fair bit of contorting, wrestling with the tools, whilst laying flat-out on the adjoining deck. It was worth the distraction though, as by the time I was finished I had an idea. I grabbed the laser level, and shot a horizontal line along the front edge of the turret. It projected a contour line, similar to a marine chart, onto the roof, and instantly revealed the problem. The port butt-board join was 40mm higher than the starboard side. I used a snatch strap to pull it down to the correct height, and the contour looked much healthier. Satisfied that we were now at least symmetrical, I still had to wrestle the camber into submission, as the leading edge of the ply was forming into to three separate arcs, rather than a unified shape.

The next day, I cut three stout bearers into the required camber, then cut three lengths of 68mm stock that will become the front support of the turret. The bearers were positioned underneath, and 65mm stainless screws screwed through the whole lot to see if they were strong enough to bend the assembly into shape, which they did.
Now that we are satisfied we have the turret under control, we can begin gluing and screwing the various bearers, packers and reinforcements that form the structure, then lay the top layer of ply sheeting to finish up.
On a personal note, It occurred to me the other day, that there is a sort of natural order to the building process of the Sarah. The turret has been the most difficult fabrication so far, but also the most enjoyable. Part of the enjoyment, is the knowledge that we could not have managed it when we started, but the experience we have since gained, has given us the confidence to complete the project. We learn as we go.


That weather forecast looked horrid!
We are both always fascinated by the intricacies of building Selah … a window into what it took to build TIE. We appreciate your comment about learning as you go and being better equipped to tackle difficult stages now than at the beginning of the build. Still, it would be well beyond us!
LikeLiked by 1 person
Hi guys. Interestingly the big wind didn’t eventuate! One of the few times BOM have got it wrong, over the last few years I have been closely tracking the weather here. It turned out to be just the regular blow. I’ve been meaning to ask you: now that you are full time, do you think the IridumGo Predict Wind package is worthwhile for coastal cruisers? Do you find you have sufficient 4G coverage to just rely on MetEye?
LikeLike
For around Australia you don’t need it. You can use the BOM exclusively. You can access the BOM forecasts in 3 ways – 3G or 4G, VHF radio with VMR, and thirdly the BOM transmits every 4 hrs updated forecasts twice a day via HF radio. You can get an HF SSB receiver from Tandy or similar store for less than $200. That is what we use in remote areas.
LikeLiked by 1 person
Excellent: thanks for that.
LikeLiked by 1 person