
Launch day is booked for the 27th. Only 18 days to go, and other than a major calamity I think we are going to be ready for the transport team.
So how are we feeling? It is something of an emotional roller coaster. Fit-out is by its nature mentally demanding, as there are so many small details to be worked through and remembered. Each component has differing space requirements and fittings. Nuts, bolts, electrical connections and a myriad of other details. An example is mast assembly. We have discovered that we need a 1/4″ pop rivet gun. Sounds simple enough, except that they are rare as hen’s teeth, and we were unable to locate one locally. So we have ordered one from eBay which we will probably sell on after the build. It all takes time and emotional energy.
As I write this, we are just learning of the bush fire tragedies occurring in New South Wales and Queensland and I am reminded of how minor are our concerns compared to many others. Australia is a continent of such extremes, as we in Tassy experience a rainy cold front with snow in the highlands. Our thoughts are with those affected and we are praying there is no more loss of life.
But first heres an absolute highlight for us. Please meet Isla Marie Ruth Harris, our new grandaughter. Her middle names are her grandmothers. Deb’s is Ruth.
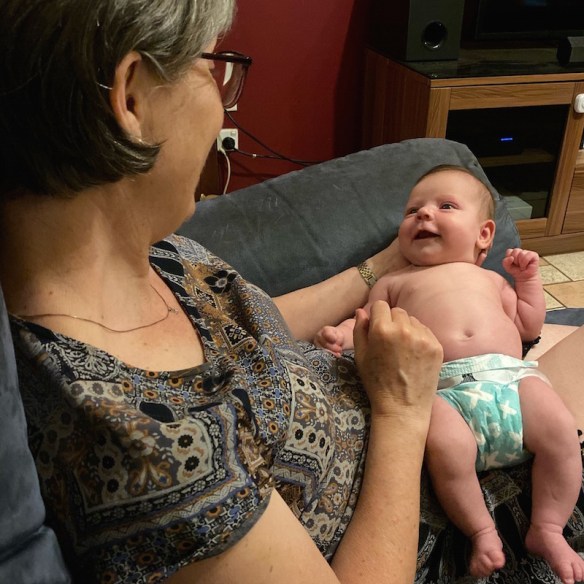
Deb with the newest addition to the family.
Deb is now back in Tassy, as we work seven days a week in the final push to get Selah into the water.
We are close, but here is still an impressive list of things on the to-do list.
Our focus is on the “not-negotiable” jobs. Things that must be completed to make her sea-worthy and fully functioning as a ship.
Engines, skin fittings, plumbing & electrical and anchoring systems.
Yet to be done: assembling the mast and boom fittings, mounting the winches and cleats, and of course, the biggie – backing her out ready for the moving truck.
The electrical system is completed, and I couldn’t be happier with how it has gone. After assembling the components, I arranged for the suppliers to commission the system. All went without hitch, as we ran checks on the various functions. There are a few bugs to iron out. Most annoyingy, the main saloon light it not working. Thats on the list to trouble-shoot; hopefully just a poor connection.
It was strange the first night we went “live”. She seemed to come to life, with a host of hums, clicks and the purring of the fidge compressor. Noises that have since become the background of everyday life. In a few weeks, those noises will be joined by the lapping of water, and wind in the rigging. Ships are rarely quiet.
So, there is a bit of a background story to our electrical system. A couple of years ago, an old chap turned up on-site looking for a source of marine ply for a project he was working on. We helped him out with some ply, and in the process discovered he was a retired electrical engineer. I had been praying for someone to help with electrics so I took his presence as a literal God-send and asked if he would be willing to assist me in designing the most appropriate system for our set-up. Harry, (I’ll call him, as he has no digital footprint, and prefers to keep it that way) is wonderfully eccentric and has since become a great mate. His life story could fill a book and his expertise in pretty much everything, is astounding, including two years as chief electrical engineer on the tall ship Endeavor, during which he circumnavigated the globe. He graciously agreed to help, mainly to prevent me from “messing up this beautiful ship”. That comment endeared me to him instantly as I recognised the sentiment. Respect for the ship is a sign of a true seaman. Its a contract: we look after her, and she will look after us when the chips are down.
So together we sat down, and he guided me through the design process. Also, over a few sessions he taught me the “proper” way to do terminations, strip wire, heat-shrinking and the general do’s and dont’s of marine electrics. It was he who advised me to forego a marine switchboard and use a regular domestic switchboard with conventional circuit-breakers. This I was happy to comply with, as they are literally 20% of the price, and according to Harry, inherently more robust and reliable. And yes, they are safe and compatible with 12V DC systems.
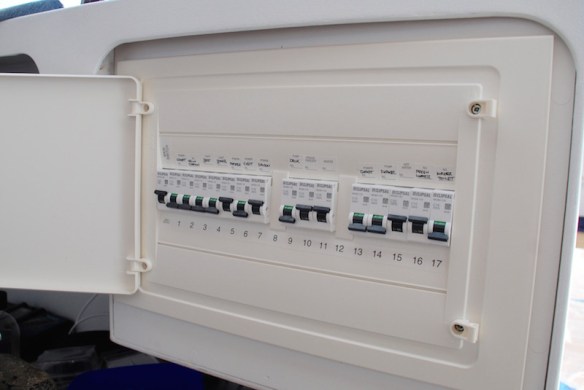
We are using regular domestic switchboard and circuit breakers. Works brillantly.

For the first time ever we employed outside contractors to work on our boat. The guys from DES eletrical hooked up the solar pannels, connected the 240V oulets, programmed the Easy Solar unit and checked that everthing was functioning as it should.
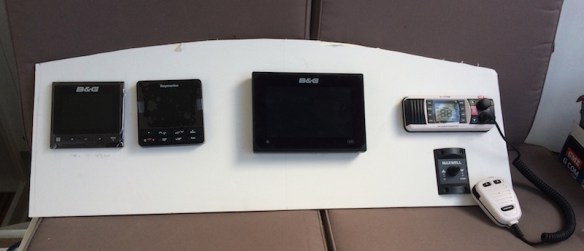
I made a mock-up of the helm station to make sure the bits fitted properly. I have allowed space around the Chartplotter for a later upgrade to a 12″ screen.

It’s quite difficult to cut a smooth curve freeform with a jigsaw, so I made a template using a batten and my trimmer to create a nice curve, and then used the template to router the actual dress sheet.
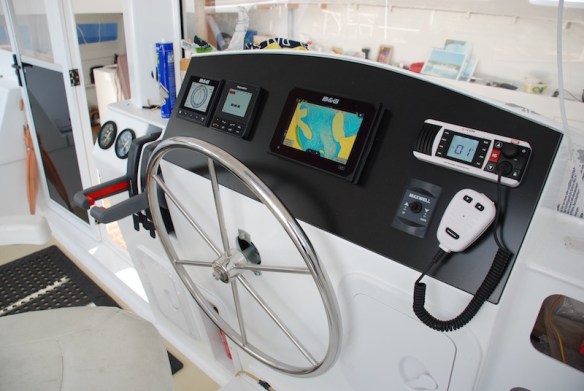
Helm station is complete.
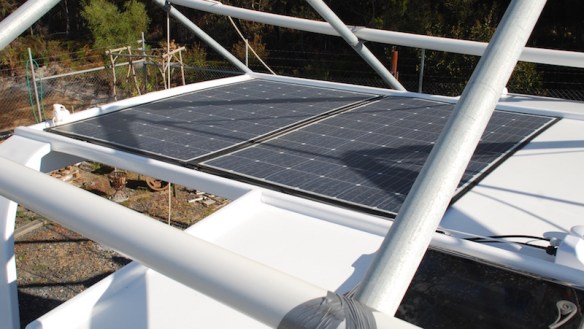
The 600W solar panel array seems to be able to meet most of our daily power requirements so far.
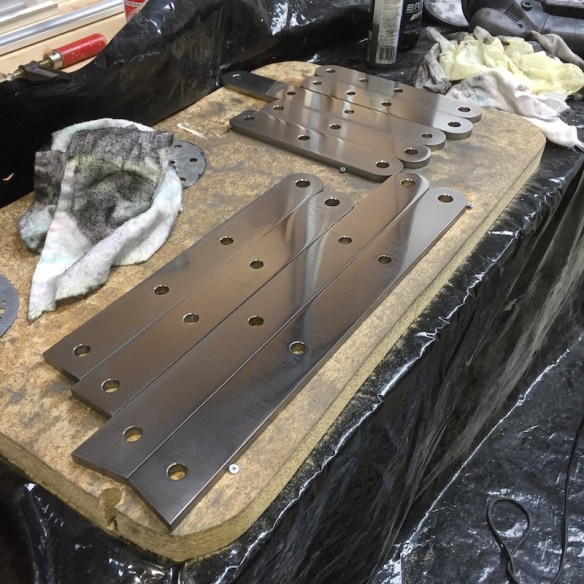
Finaly, after a false start 12 months ago, our metal work is completed and mostly installed. I have written on this in a previous blog, but the process involved me learning how to use a CAD program, and digitising all the components. I sent the files to two fabricators to have the components cut out. The stainless was laser-cut and the aluminum water-cut. A third fabricator welded the components.

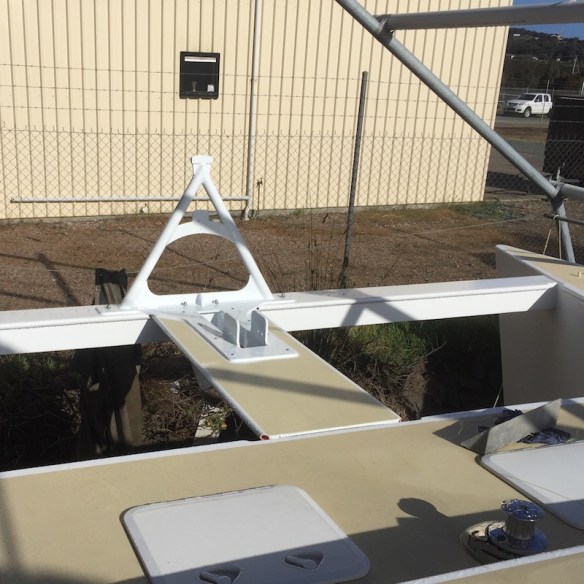
The A beam and anchor cradle instaled. We now have a cat-walk, giving us acsess to the fore-beam.
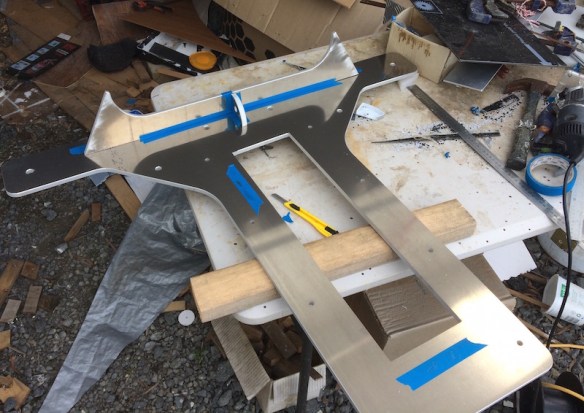
Here I have taken delivery of the aluminum components, and after beveling the edges, I taped it together with instructions for the welders.

The final assemby, after welding. It surves four functions, stiffens the fore-beam, provides a fixing point for the fore-stay, houses the anchor when underway and provides a deck level entry point for the anchor chain to be led back to the winch and chain locker. Its construced of 10mm marine grade aluminium and is very, very strong.
Powdercoated and bolted on.
The staninless components were the seven chainplates (fixing points for the wire ropes that hold up the mast , plus I designed a fabrication that serves as the emergency tiller housing and fixing point for the wheel push-pull cable.
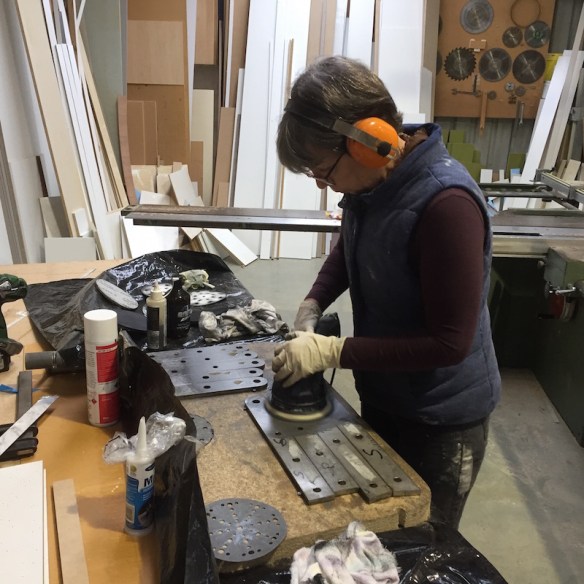
The stainless steel components needed to have the rough edges smoothed and the surfaces polished. Here Deb teaches herself how to pollish stainless steel. She worked her way up through 60 grit to 4000 grit sandpaper, using a combination of cutting compounds and polishing creams.
The final result.

After polishing we mounted the chainplates. We used 12mm flanged – button head bolts with dome nuts on the inside.
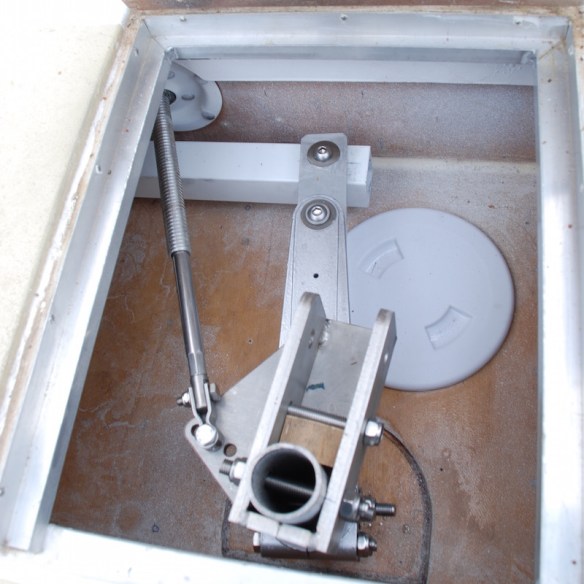
The steering assembly is now complete. Here is the stainless steel emergency tiller gousing, which also serves as the fixing point for the wheel steering push-pull cable. The adjustment holes enable me to fine-tune the wheel steering. The white powder-coated cross bar links the two rudders, and are off-set 15 degrees from the rudder.
While I was conveniently busy seeing to other jobs, Deb upon her return from Alice Springs was lumbered with the underwater paintwork. This involved a fresh coat of Penguard HB undercoat, as it been two years since the hulls were first painted, then two coats of Juotan Vinylguard 88. It is a barrier coat, that prepares the hulls for the antifoul that can only be applied within two days of launching. In the end, the underwater surfaces will have eight coats of paint applied.
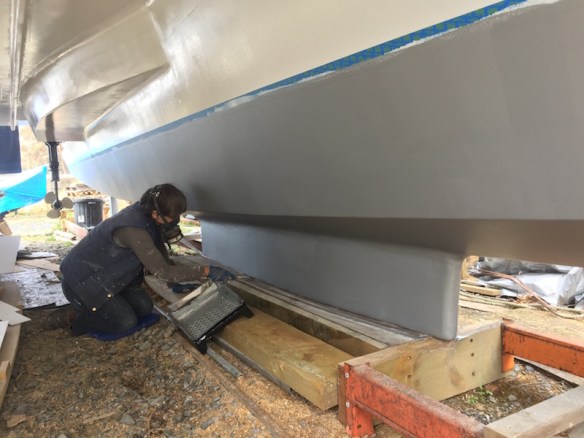
Deb finishing up the Vinylguard.
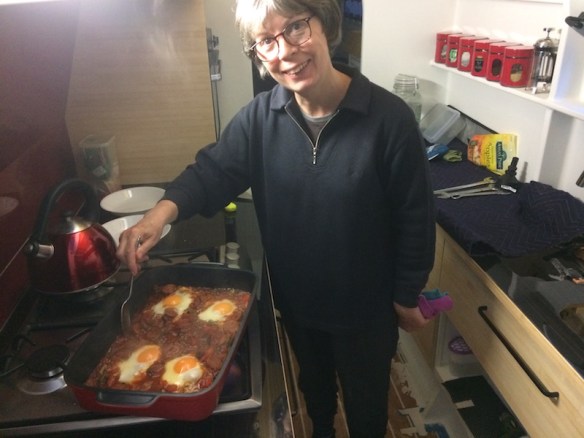
This is the first official meal prepared in our galley. I had a hankering for eggs, so Deb whipped up a dish she picked up from our daughter, Kirsty. It was delish.
Work is going on in a number of directions, as there are things that need to be completed to make Selah safe once we are on the water. An example is the connecting of our anchor rode (rope) to the anchor chain. This needs to be done in such a way to allow it to travel through the anchor winch gypsy, without jamming, as it transitions from chain to rope. Rope splicing is a traditional craft that has remained unchanged for centuries and something I have always wanted to try. So I had an enjoyable afternoon one rainy day, downloading instructions from uncle Google and figuring it out.
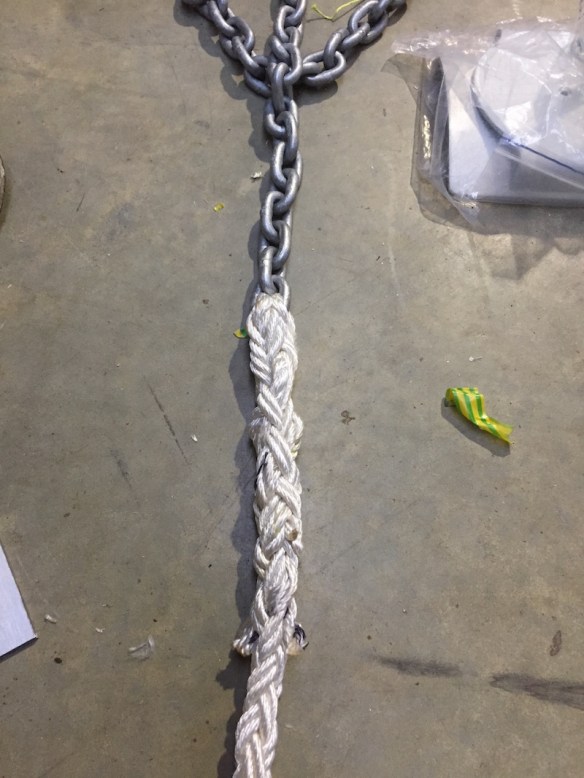
We have 40 metres of chan and 60 metres of 8 strand nylon anchor rope.
Next on the list of completed works is the plumbing. We now have hot & cold running water.
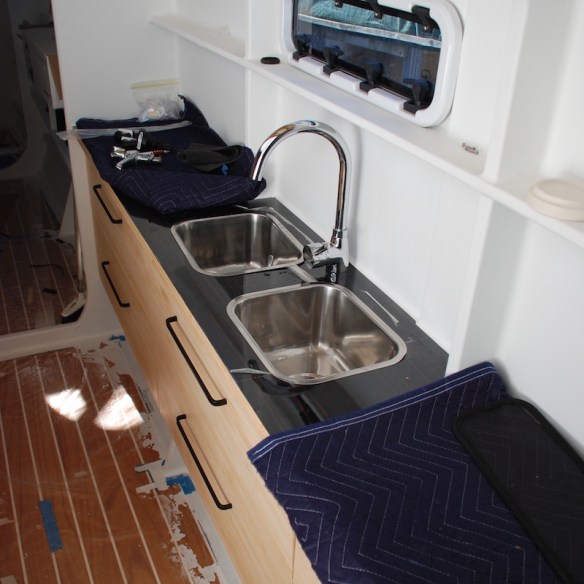
The kitchen is up and running.

I chose to mount the water connections and mixer manifold “outside” in the outboard motor pod area. This avoids joins and connections in the bathroom where space is limited. The manifold is mounted in a sealed waterproof electrical junction box. Once we are assured the connections are not leaking, I will spray with anti-corrosion and close it up.
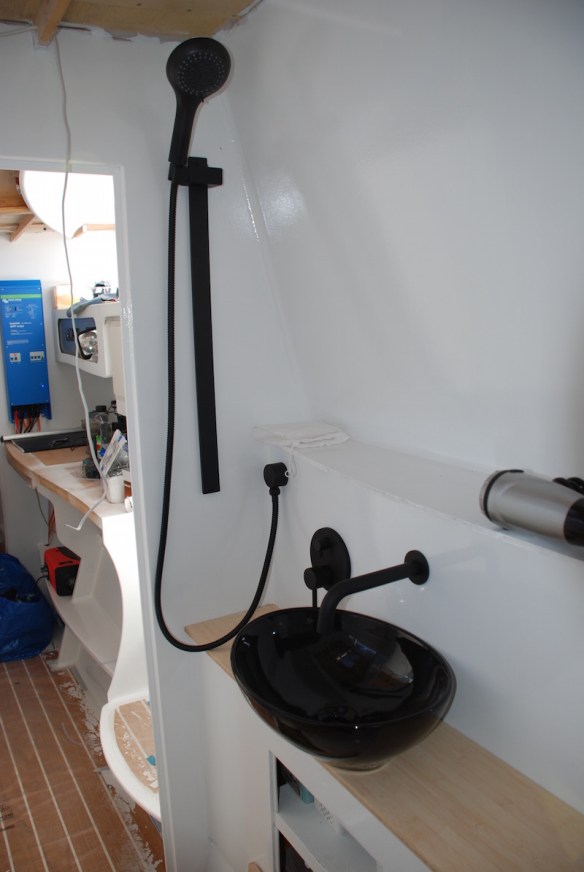
The mixer tap is an adapted bath/shower diverter, so a single tap serves both the sink and the shower.

Pete and Deb,
Congratulations on so many levels. New grand daughters are a delight and of course new boats have such potential for delight.
Your work continues to inspire us and it was only last week that I searched through your photos to nut out a solution for the rudder bar connection. Thanks again…all sorted.
Looking forward to seeing her in the water the next time we are down.
In your final push, don’t forget to pause and reflect.
Blessings Greg and Bernie.
LikeLiked by 1 person
Hey Greg, glad to hear our experiences have helped, and thanks for the reminder to Selah … timley advice. Even in the preassure and stress we try to remember that we will probably never do anything like this again, and should savour every moment!
LikeLike
Yet another great post Pete. I always enjoy reading them but it just gets better and better and us readers are getting pretty excited albeit to a level that must only be a small fraction of what it’s like for you.
Loved that little paragraph that begins ‘It was strange the first night we went “live”….’ Also the Harry story.
Don’t know Deb if you were forced to polish the silver for your Grandma when you were a kid, or what other training went into but you’re going to always be proud of those bits of aluminium. As will you Pete!
Great job guys
LikeLiked by 1 person
Thanks for your comments John. It was great to catchup with you guys recently. Never know … we might get to see you splash day!
LikeLike
Excellent! Such massive amount of work! Nice story about your friend “Harry”. There are wonderful, skilled and generous characters around.
Good to get a glimpse of the fittings, the helm station and some of the inside arrangements. Look forward to the full tour and the scary part: taking Selah out of the shed and into the water! Well done guys.
LikeLiked by 1 person
Thanks Chris, nice of you to comment considering you guys have a lot on your plate at the moment. Sometimes its sureal, thinking that in a few weeks time we will be sitting at anchor at Squeaking Point: an anchorage you know well!
LikeLiked by 1 person
It is nice to be distracted Pete!
LikeLiked by 1 person
Congratulations Peter and Debbie on so many levels. You two are truly inspirational. We are so looking forward to seeing you sail into Queensland waters. We pray all continues to run smoothly.
LikeLike
Hi Qualies! Yep, we are looking forward to it too. Thanks for your encouragement.
LikeLike
It so wonderful to see your ‘bucket list’ dream so close to becoming the reality! What an awesome accomplishment! You are both so inspirational and evidence of what perseverance can achieve! Hope you’ll be able to relax and recharge once Selah is afloat! Congratulations Pete and Deb.
LikeLike
Thanks guys. You two know a thing or two about crazy big projects! Thanks for your encouragement.
LikeLike
It so wonderful to see your ‘bucket list’ dream so close to becoming the reality! What an awesome accomplishment! You are both so inspirational and evidence of what perseverance can achieve! Hope you’ll be able to relax and recharge once Selah is afloat! Congratulations Pete and Deb.
LikeLike
Great to see you stepping your mast today. Greatly improved weather from the dreadful winds of the proceeding week. She is looking very pretty. Selah, Brent
LikeLike
Thanks for your comment Brent. It was lovley to meet you on Sunday. Yes, we had a excelent day heading down the river, and a beautifuly still night at Dark Hollow. Out first night on the pick! Came through to Devonport yesterday without drama, and am now sitting on a nice heavy mooring right alongside the Julie Burges.
LikeLike